Jupytext: The hack-free way to use Jupyter notebooks with git
As mentioned previously, I’m a big fan of
Jupyter Notebook/Lab. That said, there is one thing that’s always irked me
about working with Jupyter notebooks: Jupyter’s .ipynb format doesn’t
play well with version control software like git. Jupyter notebooks use
a JSON-based format that allows for storing both the input and the output
of each cell.
Unfortunately since JSON is not a line-based format git’s diff algorithms
don’t work properly on JSON. JSON isn’t particularly readable for humans
either, which means you need to use Jupyter Notebook itself to view your
notebook files instead of just opening them in any text editor the way you
would a .py file. Until recently this meant that if you wanted to use common
development best practices such as pull-request based workflows and code review
with Jupyter Notebook you were pretty much out of luck. Worse, you can’t use
the goodies that your favorite IDE/text-editor provide on a Jupyter
notebook, so your notebook code ends up being more difficult to refactor
than a normal Python script would be.
Luckily the Python community has come to the rescue with a brilliant
Jupyter notebook extension called Jupytext. Jupytext solves
all of these issues by letting you link a Jupyter notebook to a second
file in another format (.py and markdown being the most commonly used).
Jupytext then takes care of bi-directionally syncing the two formats, so
once you’ve linked your notebook to a .py file whenever you click
Save in Jupyter it will save an updated copy of your notebook to the
linked .py file as well. The best part is that this sync is
bi-directional: if you edit the .py file it’ll also update your Jupyter
notebook with the corresponding changes (although you’ll have to refresh
your browser window to see the changes).
This is pretty great – not only do you get a .py file that you can keep
in version control the same way you would any python project, you’re also
able to use fancy refactoring features from your text-editor or IDE to
edit the .py file, do any complicated refactoring you see fit, and
immediately (well, technically after hitting refresh in your browser tab)
see the changes in your Jupyter notebook.
Setup
Interested? Setup is fairly straightforward, and once set up it works in both Jupyter Notebook and Jupyter Lab.
The first step is to install the python module that powers most of this magic. From a terminal do:
pip install jupytext --upgrade
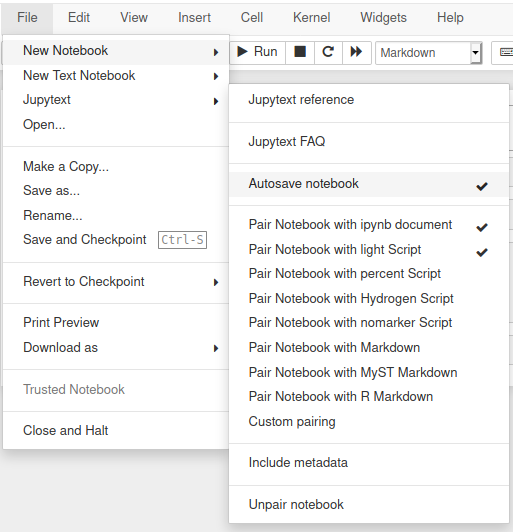
If you fire up Jupyter Notebook (by running jupyter notebook from
a terminal window), you’ll see that there’s now a new Jupytext item in
Jupyter Notebook’s File menu:
NOTE: If you’re using Jupyter Lab instead of Jupyter Notebook this menu won’t be visible, but you can still use Jupytext via the CLI command described below. See the Jupyter Lab section at the end of the post for more info.
If you select Pair Notebook with Markdown from the menu and save your
notebook, you’ll notice that Jupytext created a new .md file in your
folder with the same name as your notebook. When you open it, you’ll see
that the contents of all your cells have been written into the markdown
file. That markdown file is now being kept in sync with your Jupyter
notebook, if you make changes to it you’ll see the changes appear in your
Jupyter Notebook window (after a refresh) as well.
For reasons that are beyond me, the developers of Jupytext chose not to
include Python in the list of pairings that are provided in the GUI, so
while Jupytext is quite capable of saving a .py file as well as
a .ipynb file, we need to configure it to do so manually.
You can do this from the Jupyter notebook GUI by going to the Edit menu and choosing Edit Notebook Metadata. You’ll be presented with an editable blob of JSON text. If you’ve paired the notebook with another format as mentioned in the previous paragraph you should see a piece of JSON that looks like this:
"jupytext": {
  "formats": "ipynb,md"
}
Change the md in the format section into py so so that it looks like
"formats": "ipynb,py" and click save, and Jupytext will start saving
a copy of your notebook into a .py file with the same name as your
notebook.
If you don’t like editing JSON manually or prefer the command line, you can also do the same thing via a CLI command:
jupytext --set-formats ipynb,py --sync <your-notebook-file>.ipynb
The above tells Jupytext to write every change made to your notebook to
both <your-notebook-file>.py and <your-notebook-file>.ipynb. As long
as Jupyter notebook is running, edits to either the .ipynb file or the
.py file will update both files.
Jupyter Lab Addendum
As mentioned above, if you’re a Jupyter Lab user things work a little bit
differently. The Jupytext extension doesn’t change the menus in Jupyter
Lab, so rather than going to Edit Notebook Metadata, you’ll need to
use the jupytext --set-formats ipynb,py --sync <notebook>.ipynb method
to create the link between your notebook and it’s text representation.
Additionally, the first time you start Jupyter Lab after installing the
Jupytext extension you may get a message saying Build Recommended
jupyterlab-jupytext needs to be included in the build, make sure you
choose build here so that Jupyter Lab will correctly load the Jupytext
extension.